Migrating from Bitbucket, ServerPilot & DeployBot to GitHub & Forge
If you're looking to move away from DeployBot, ServerPilot or Bitbucket, this may come in handy.
Posted 13th July 2020 • Development • #development
Note: this article is outdated. We are now using Ploi to provision all client servers. Forge has stagnated over the years, and their support is pretty much non existent. Ploi is a fantastic solution to server provisioning, with very responsive support over on their Discord server.
Why move to GitHub?
Well, I'm running out of repositories on DeployBot and haven't been that happy with it for the last few months. Bitbucket has also been very unreliable for some while and I'm really enjoying using GitHub. It's also now free to host private repositories, which is huge.
Considerations
Clients usually don't ever need access to their server, but if they do, they shouldn't need to create an account somewhere to do so later. When we set up a client website on DigitalOcean & ServerPilot, we make sure that the client owns their own hosting so that they have the keys to everything. The reason I didn't touch Forge before is because I can't give a client access to my own account, and I don't want them paying $12 a month for access they don't really need or use. But if they do need access to their deployment system, or they stop being a client, it needs to be easy to hand off to them - I don't want to hold anyone hostage.
It's worth noting that the client can own their Forge account too and provide access via Circles, but requires that the client have a top tier account, which is normally overkill. So swings and roundabouts.
Moving the repository
There are two ways to move a repository from Bitbucket to GitHub:
Manually
The advantage of this method is that your local copy will already be pointing at the new location when you're finished. Running the commands below will change the remote/origin for your repository from Bitbucket to GitHub.
- Create a new repository in GitHub (don't include a readme file, it needs to be blank).
- Clone your Bitbucket repo
cdinto your repo directory in the command linegit remote set-url origin [<https://github.com/USERNAME/PROJECT.git>](<https://github.com/USER/PROJECT.git>)git push -u origin master- If you use branches for each environment, you'll want to push the
productionbranch too.
You can now delete your repository in Bitbucket through their website.
GitHub Import
You can also do it automatically using GitHub's Import tool here: https://github.com/new/import.
If you do this, you'll need to type your Atlassian username and password in partway through.
You can now delete your repository in Bitbucket through their website. You'll need to either re-clone the repo from GitHub to your machine, or update the origin using the manual steps above anyway.
Set up Forge
Setting up a new server
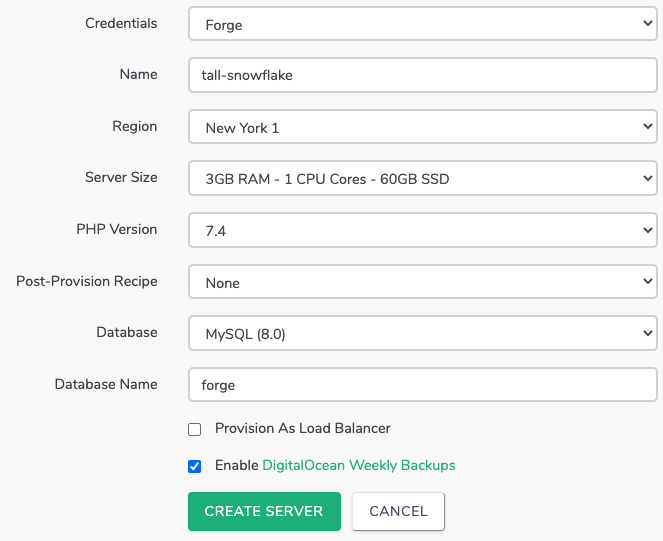
In the Forge dashboard, click Create Server (DigitalOcean), and fill in the details of the server you want:

You'll get a popup telling you the sudo password for the forge user for that server and if you created a database, it'll show you the user's database password. They'll also be emailed to you.
Note that you can't login to the server with that password; Forge disables username and password login by default and uses only SSH keys.
Go and make a cup of tea, it's going to take a while for Forge to set up the server. Once it's done, the server status will change from Provisioning to Active.
You can click on the Unknown connection if it doesn't update automatically to check it, and it'll change to Successful.
Click on your new server name. Delete the default forge site. You'll be setting one up from scratch with the correct domain (you can also delete the database).

Setting up a site on an existing server
Click on your server in Forge. There's a box at the top for setting up a New Site.
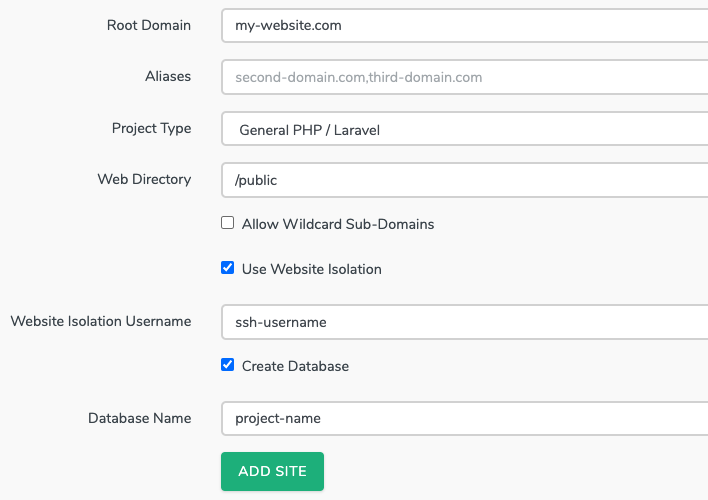
Fill in all the details. If this server is only serving one website, you can leave the forge user as the default and connect with that.
If it's going to serve multiple websites, enable Website Isolation. This lets each site have its own SSH user instead of all of them using the forge user, so you could give a developer access to only one site. You can create the database now and add a user to it later. You don't create a password, because it's all done with SSH keys.

Deployment
Click on the site's URL in your server to get to the Site settings page & add GitHub as an app
Set the Branch to production (if you a 1:1 relationship for branches to environments).
Once "Installing Repository" (which means it's deploying your files) has finished, enable Quick Deploy. This will always deploy the chosen branch to the server on push.
You can also optionally also click on Notifications in the sidebar and set up Slack notifications.
Migrating
Now the server's set up, it's time to start moving the website from the old server to the new one.
Prepare for migration
- Backup the database of the live site
- Backup any user-uploaded assets
- Backup anything else that isn't version controlled
Database Setup
Unlike ServerPilot, Forge keeps databases under Servers instead of per-site.
Go to the server page in Forge and add a database user with a username and password, and give them permission to access the new database you added when creating the site
Import the database to the new site using a GUI like TablePlus or Sequel Pro. You'll need to enable SSH key login and set it to the correct database type (like MySQL 8).
Re-upload files
Upload the user-uploaded assets and your non-version controlled files (.env)
If your user-uploaded files are really big, it'll be quicker to zip them up locally, upload the zip file, then run $ unzip filename.zip on the server
It's worth noting that you can actually edit Craft's .env file through Forge's web UI If you go to Sites, then Environment.
Configure the server
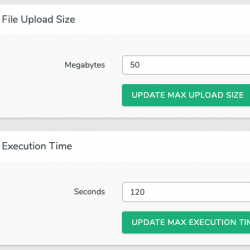
ServerPilot had a .user.ini file for updating PHP values. That won't work here, so go to Server > PHP and update Max Execution time to 120.
You'll also want to set a size limit for file uploads. It looks like if you leave this blank, uploads don't work at all.
When that's all done, you're ready to make the switch. Update the DNS A records for your old server to point at the new IP address.
SSL
Once the DNS has resolved, go to the SSL tab under Sites in Forge. You can just click LetsEncrypt, then Obtain Certificate. Job done.
Forge will automatically include both the www and non-www version in your certificate request.
- Setting up www redirects isn't necessary as Forge will automatically set up a redirect to the non-www, or www version of the site depending on the URL.
- If you use SSH Config to save typing when connecting to SSH servers, update your
.ssh/configfile with the new IP address. - If you use Craft Scripts, make sure to update .env.sh with the new remote details
htaccess
You don't need to add anything for Craft to work immediately, but if you were doing things like setting cache-expires headers on files to meet Google PageSpeed Insights recommendations, you need to write something for that in the nginx server config - it doesn't use .htaccess files as they are only for Apache.


